|
Home Logic UR362 Programming Guide:
To set the clock: Press [EDIT], then [TIME/DATE]. Press [UP] and [DOWN] to change the value, and [LEFT] or [RIGHT] to select the next item. Press [EDIT] to save.
To learn signals: Press [LEARN]. Select the device you would like to learn under. Press a button and then hold the source button on your original remote until the display reads "OK". If it shows "ERROR" it was unable to capture the code; "NO DATA" means it could not see any infrared activity. Press [LEARN] to save.
To learn on multi-code keys: Follow the directions above to learn a signal on [S1] through [S5] or the [POWER] button. To learn the second signal select the button again, and again for the third, fourth and fifth signals. Note that you cannot change a single learned entry; you will need to start over from the beginning. Press [LEARN] to save.
To record a macro: Press [LEARN] and then the [MACRO] button. Select a button to place the macro on � any component button or [0] through [8] and [+10]. Now, navigate the remote and enter the sequence of commands you would like. Note that changing devices counts as 1 out of a possible 20 steps. To add a delay, hold the button you would like the delay after. A counter at the top of the screen will start at 1 and go up to 99 � release the button when you reach the desired delay length. Press [LEARN] to save. It is also possible to record up to five macros on a multi-code button by pressing the button multiple times, however note that all macros on that button will play back in sequence.
To use a macro: Press the [MACRO] button. The screen will read "MACRO?". Now press the component or keypad button which contains your macro.
To add an alarm: Press [EDIT], then [ON/OFF ALARM]. Press [UP] and [DOWN] to change the value, and [LEFT] or [RIGHT] to select the next item. Press [EDIT] to save. After you have set the desired time, press [EDIT] to save the alarm as a timed buzzer, or press [RIGHT] followed by a macro button to save it as a timed macro.
To enable/disable alarms: Press the [ON/OFF ALARM] button. When alarms are enabled a small clock icon will appear on-screen.
To set a sleep timer: Select the device you would like to turn off and then press the [SLEEP] button. On the first button press the timer will be set to 15 minutes, press again to scroll through 30, 45 and 60 minutes, and once again to disable. After a timer has been set you may check the remaining time by pressing the [SLEEP] button. Press the [SLEEP] button multiple times to lengthen the amount of time or disable it.
To select label pages: Press the [LANG] button. The screen will read "PAGE 1" or "PAGE 2". Note that it is recommended to edit the values on Page 2 only.
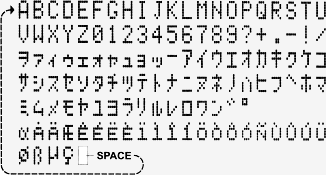
Complete character list.
|
To edit button labels: Select the device you would like to change labels on. Press [EDIT] and then press the user or component button you would like to edit the label of. Press [UP] and [DOWN] to change the value, and [LEFT] or [RIGHT] to select the next position. Press [ENTER] to clear a position or add a space. Press [EDIT] to save. All names will be auto-centered.
To edit multi-code button labels: Follow the directions above to edit the first label on a multi-code key. Each time you press the multi-code button the unit will step to the next label.
To enable or disable the beep tone: Press the [AUDIO] button. When the beep tone is enable a small musical note symbol will be displayed on-screen.
To clear a button: Select the component which contains a button you want to erase. Press the [CLEAR] button followed by the desired button. "OK!" appears on-screen.
To clear all data for a device: Press the [CLEAR] button followed by the component you would like to erase. "CLEARING" appears on-screen followed by "OK!".
To clear a macro: Press the [CLEAR] button followed by [MACRO] and the component or keypad button containing the macro you want to erase. "OK!" appears on-screen.
To reset the clock: Press the [RESET] button.
Low battery symbol: If the low battery icon stays lit on-screen it is recommended you soon replace the remote�s batteries. If the icon is flashing the remote will refuse to operate until you replace the batteries.
|