|
...Continued from Page 9.
Changing an alias.
|
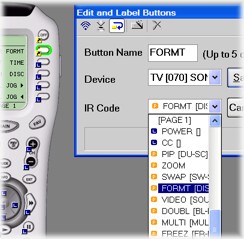
As mentioned earlier, macros can only be assigned to LCD-based buttons and the two [Power] hard buttons. If you simply must have a macro on another hard button, this can be accomplished through aliases. An alias is a soft link to another button � it basically says �this button should behave just like that one� and will reference single commands or complete macros. Aliases cannot be used on double-function buttons. Changing the alias, or where a button points, is done on the �Edit and Label Buttons� window. Normally, a button points to itself � to change that, just select a new device and command from the dropdown lists. It�s also possible to copy and paste buttons anywhere on the emulator via the �CTRL-C� and �CTRL-V� keyboard shortcuts, but this only aliases one button to another and doesn�t make an exact copy of learned codes or programmed commands.
Aliases are handled differently than �Punchthroughs�, which MX Editor also supports. Conceptually they�re the same thing; punchthroughs merely alias a whole group of buttons at once. Listed as setup item number six, punchthroughs are handled on a device-by-device basis for four individual control clusters: volume, channel, transport and numeric keypad.
The SideKick.
|
Just what SideKicks are for...
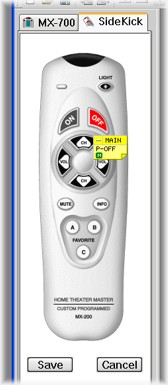
Programming step number seven is configuring the SideKick. Simply drag-and-drop whatever commands you like from the MX-700 onto the MX-200�s buttons. The MX-200 is capable of holding anything on its 11 keys that the MX-700 can, from lengthy press-and-hold macros to double-function buttons. Indeed, it�s such a robust little remote I just wish there was more of it!
Finally, the last step shown in MX Editor is customizing the MX-700�s automatic backlight timeout, from 0 (stay on only as long as the button is held) to 99 seconds. The SideKick even picks up the same timeout period automatically!
Favorite channels & such.
An important step not listed separately on the handy �things to do� menu in MX Editor is setting up the �Favorite Channels� section of the remote. Ostensibly created as a way for absent-minded channel surfers to quickly access their favorite channels directly by name (or at least, by a 5-character version of that name), this section can be used for almost any purpose.
The emulator.
|
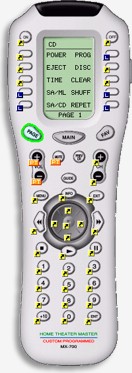
Accessed by hitting the [Fav] button on the remote, this area can contain up to five LCD pages worth of buttons. Note that only macros can be stored here � the other hard buttons below the screen maintain the same functions as the previously active device.
With the MX-500, Fav section macros could only hold up to 10 steps and access a device�s numerical keypad. With the MX-700, such limitations have been banished! Fav macros are now full-fledged, capable of accessing all commands from any device. Don�t have 50 favorite channels? Dedicate a page to lighting modes � once you�re done perfecting the ambiance, press the [Main] button to return to the last visited device. As a side note, pressing the [FAV] button rotates forwards through page numbers, while pressing [PAGE] moves backwards.
All buttons on the emulator indicate whether they have assigned steps. If a key holds a learned command, a little blue �L� appears on the sample MX-700. Aliases are shown with a yellow arrow; punchthroughts get an orange �PT�; macros a green �M� (or an �F� for the favorite channel versions). IR database commands only get a nearly invisible tiny red dot; I would have thought a red �D� matching the other letters would have been appropriate. Holding the mouse cursor over any button produces a popup that indicates quickly what command it contains � especially useful for aliases.
|